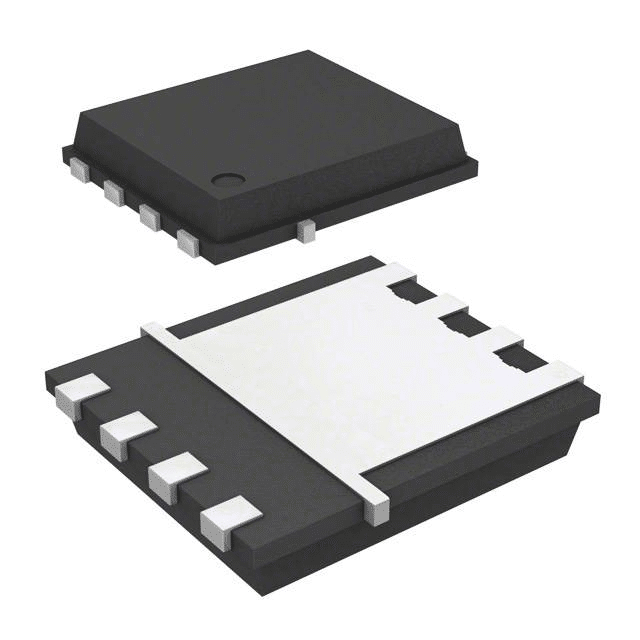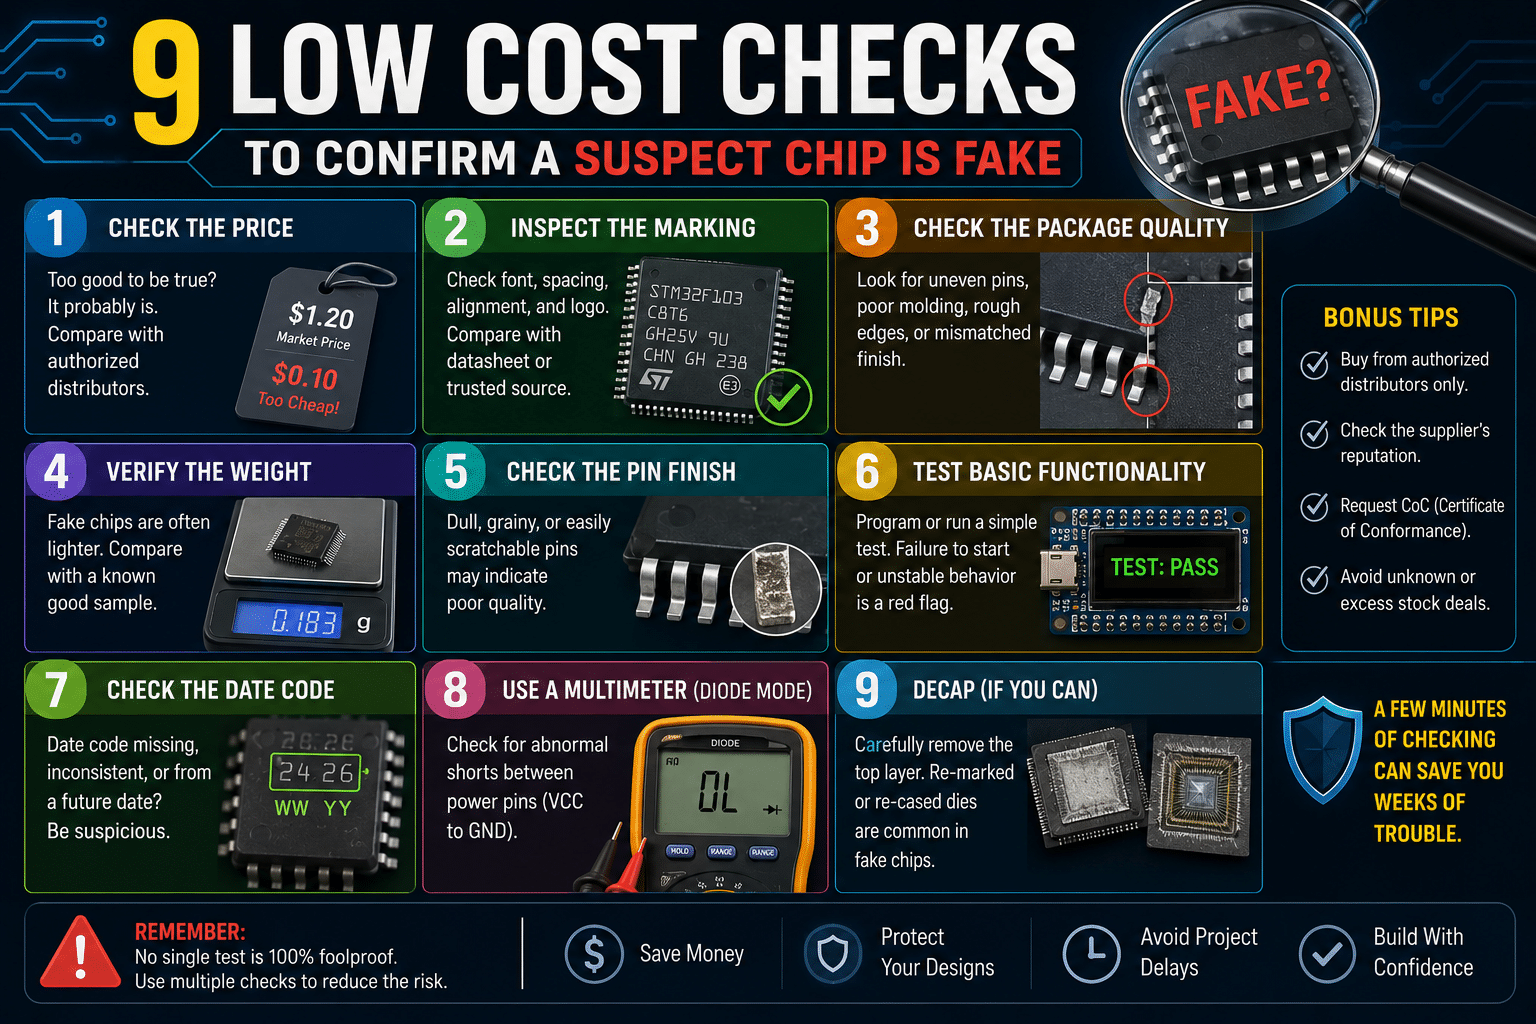
To verify counterfeit electronic chips, start with visual inspection using a magnifier, solvent wipe, and multimeter to detect resurfacing marks, blacktopping coatings, blurry markings, and inconsistent package color or texture. These low-cost checks cost almost nothing yet catch the majority of fakes, with most counterfeits identified in the first three steps.
Each test runs under five minutes per part and targets a specific counterfeiter trick. Industry inspection guides in 2025 and 2026 endorse this layered approach, reserving bench tests under $50 for high-value parts only.
So how do you verify counterfeit electronic chips without sending them to a approximately $2,000 lab? You start with the cheap stuff.
The nine checks below cost almost nothing, a magnifier, a solvent wipe, a multimeter, your own eyes, yet they catch the majority of fakes before they ever reach your board. Each one targets a specific trick counterfeiters use, and most take under five minutes per part.
Work through them in order. A chip that fails even one of these tests is suspect enough to reject, and you’ll know exactly why.
Quick Takeaways
- Inspect chips visually with magnifier, solvent, and multimeter before costly lab testing.
- Catch most counterfeits in the first three low-cost inspection steps.
- Run the acetone scrape test to detect blacktopping for under $2.
- Reject any chip that fails even one inspection check.
- Reserve sub-approximately $50 bench tests for high-value parts only.
The 9 Low Cost Checks At A Glance And When Each One Wins
Want to know how to verify counterfeit electronic chips without sending parts to a lab? Start with visual inspection (free) and stop early once a check fails. Most fakes get caught in the first three steps. Reserve bench tests under $50 for high-value parts only.
The checks below run from zero-cost optical work to simple electrical bench tests. Confidence ratings reflect how reliably each catches resurfacing, remarking, or recycled parts when used alone.
Industry guidance in 2025 groups these into physical inspection and electrical testing, and pairing the two raises your hit rate sharply.
| Check | Cost | Time | Confidence Alone |
|---|---|---|---|
| 1. Packaging, trays, moisture cards | Free | approximately 2 min | Low-Medium |
| 2. Body markings and laser etch | Free | approximately 3 min | Medium |
| 3. Acetone/scrape blacktop test | approximately $2 | approximately 1 min | High |
| 4. Pins, leads, coplanarity | approximately $15 loupe | approximately 5 min | Medium-High |
| 5. Date code and database cross-check | Free | approximately 10 min | Medium |
| 6. Package thickness and weight | approximately $20 caliper/scale | approximately 3 min | Medium |
| 7. Continuity and pin map | approximately $10 meter | approximately 10 min | Medium |
| 8. Supply current draw | approximately $30 bench supply | approximately 15 min | High |
| 9. Diode/I-V curve trace | approximately $50 tester | approximately 20 min | High |
When each wins: Check 3 (the acetone wipe) is the single best dollar you can spend,genuine laser marks survive solvent while reprinted text smears. Use Checks 8-9 only when a part costs more than your test gear or feeds a safety-critical board.
Check 1 Inspect Packaging Labels Trays And Moisture Indicators
Before you even touch the chip, take a good look at how it was packaged. When the lot codes on the reel label don’t match the parts sitting inside, that’s honestly the quickest warning sign you’ll find for a repackaged fake.
This check costs you nothing, and it catches a surprising number of fakes in under two minutes.
Start with the reel label. Real manufacturer labels show sharp fonts and even color. They also stick down tight.
Blurry text, faded double images, or edges that peel up tell you someone reprinted that label, according to 2025 broker screening guidance.
Snap a photo of the label and a photo of the marking on the actual part, then compare the date codes and lot numbers one character at a time.
They really have to match.
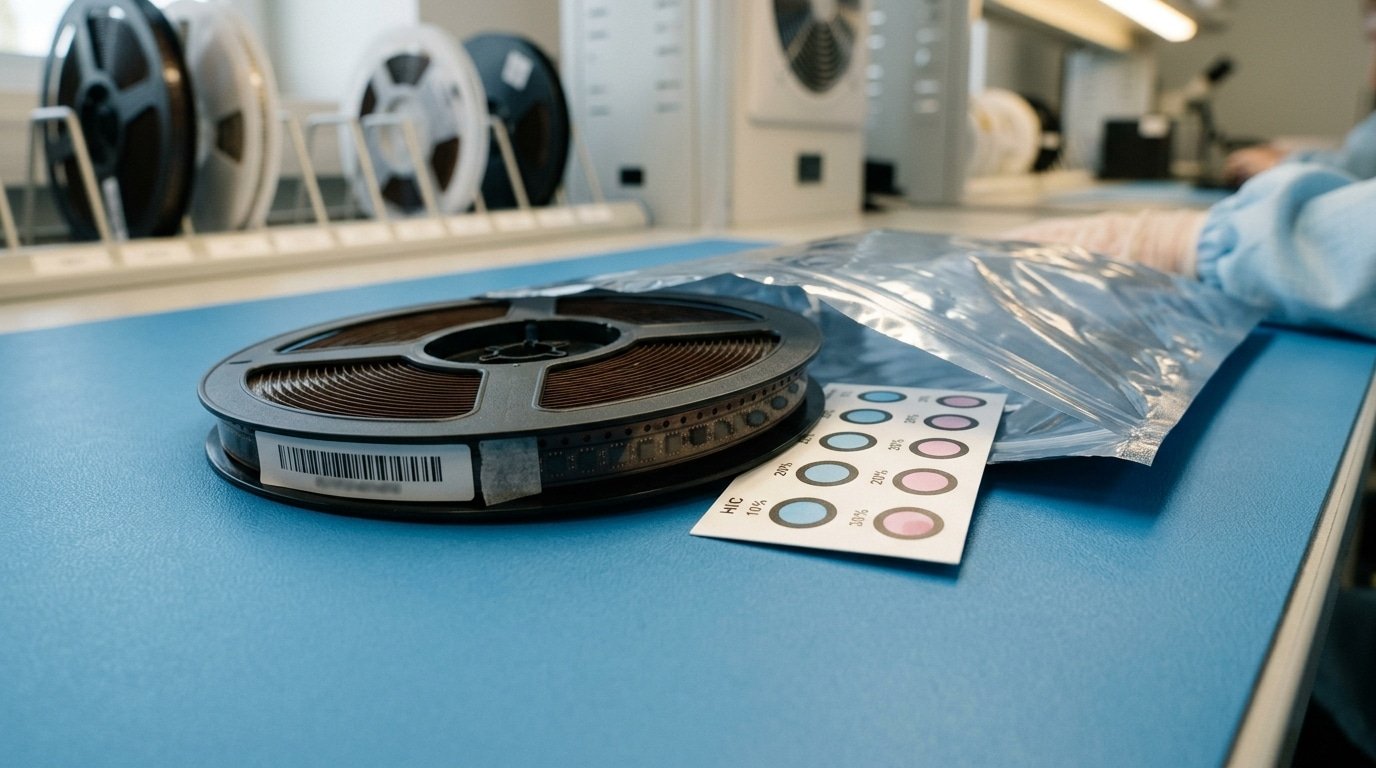
Next, open up the moisture barrier bag, which folks call the MBB.
Surface-mount chips arrive in sealed foil bags that come with a humidity indicator card (HIC), which is basically a small card covered in dots that change color, turning pink when the part has been exposed to too much moisture.
A resealed anti-static bag, a missing or expired card, or glue smeared around the seal all mean someone got into the original packaging. That’s a classic sign of repackaging.
- Reel vs part lot code mismatch, the strongest sign of remarked or mixed inventory.
- Resealed MBB, like torn-and-taped foil, double seals, or the wrong heat-seal pattern.
- Tray batch inconsistency, where chips in one JEDEC tray show two different date codes or marking depths.
- MSL label absent, meaning no Moisture Sensitivity Level rating where the device actually needs one.
The tray itself deserves a careful look too. One JEDEC tray should hold a single batch from the same source.
When you spot mixed date codes inside a single tray, it almost always means parts got pooled together from different places, and that’s a core trick scammers rely on.
Learning how to verify counterfeit electronic chips really begins right here, because honest sellers never break the chain that tracks a lot back to its origin.
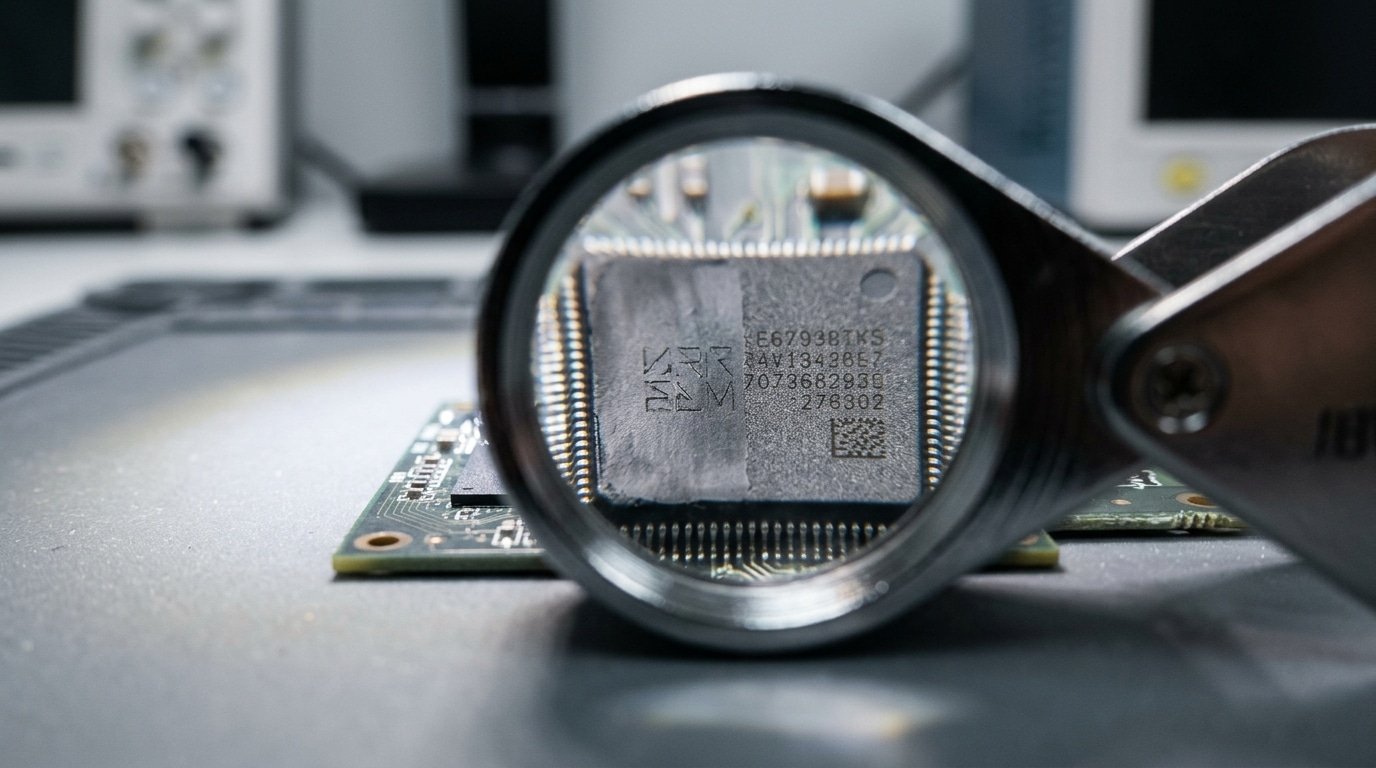
Check 2 Examine Component Body Markings And Laser Etch Quality
Grab a 30x loupe and angle the chip under a bright LED. Genuine markings are laser-etched into the molding compound, so they sit below the surface and stay sharp from any angle.
Remarked fakes use ink or a fresh paint layer (called blacktopping) that smears, reflects oddly, or floats slightly above the package. This single inspection catches a large share of resurfaced parts.
Blacktopping is the giveaway. Counterfeiters sand off the original text, then spray a thin black coating to hide the scratches.
Under angled light you’ll see a faint matte film, micro-bubbles, or a color that differs from the molded plastic underneath. Run a fingernail along the edge,resurfaced packages often feel slightly gritty where the coating pooled near the lead frame.
Font tells stories too. Check these against a known-good part:
- Logo centering—real fab marks sit on a fixed grid; fakes drift off-center by a fraction of a millimeter.
- Stroke weight—reprinted text often looks bolder or fuzzier because ink spreads.
- Edge depth—laser etch shows a clean trench wall; ink shows a flat ridge with no depth.
Industry guides note that visual inspection for resurfacing and misaligned markings is usually the first detection step in 2025, before any teardown. When you learn how to verify counterfeit electronic chips, this loupe check is your cheapest filter,often under $20 for the loupe itself.
One pitfall: don’t confuse legitimate ink-printed passive components with fakes. Some genuine parts use ink by design. Always compare against a verified reference of the exact part number, not a guess.
Check 3 Run The Acetone Or Scrape Test For Blacktopping
Acetone is the cheapest counterfeit test you own. Dab a cotton swab in pure acetone, rub the chip’s top marking for 10 to 15 seconds, and watch the swab.
Genuine laser-etched or molded text stays put. A counterfeit that was sanded down and recoated will smear ink, lift gray dust, or reveal old part numbers underneath.
This single check exposes “blacktopping”,a fake epoxy layer painted over a ground-off original surface.
Blacktopping is how recyclers hide one part number and print a higher-value one on top. When you scrape a hidden corner with a plastic spudger, real epoxy resists and shows uniform texture. Fake coating flakes off in chips, exposing a smoother or differently colored layer beneath.
Here is what most guides skip: the swab color tells you the fraud type.
- Black residue on swab — recoated blacktop, almost always remarked
- Ink smear (color matches the printed text) — pad-printed fake over real molding
- No residue, text intact — consistent with a genuine part
Industry guides in 2025 confirm that wiping markings with acetone or alcohol is a standard first-line screen because real laser marks don’t fade while reprinted parts blur or lift.
Safety first. Acetone is flammable and irritates skin.
Work in a ventilated room, wear nitrile gloves, keep it off your bench finish. Test one sacrificial unit, never your full lot.
Learning acetone exposure limits from NIOSH takes two minutes. A genuine epoxy package afterward looks dull, matte, and unchanged,exactly as it did before you started.

Check 4 Verify Pins Leads And Coplanarity Under Magnification
Reballed and harvested chips betray themselves at the leads. Under a 30x loupe, genuine factory leads show uniform tin plating, sharp coplanarity, and zero solder residue.
Recovered parts show retinned leads, ghost dimples, and uneven oxidation. If you want to know how to verify counterfeit electronic chips fast, the lead frame tells you more than the top marking ever will.
Set the chip on a flat glass slide. Tilt it under raking light.
Fresh production parts sit dead level because coplanarity (how evenly all leads touch a flat surface) stays within roughly 0.1 mm tolerance for fine-pitch packages. A harvested part rocks.
One corner lifts. That alone flags a reworked component.
Look for these salvage signatures:
- Retinned leads — dull, lumpy solder coating applied by hand to hide oxidation. Factory plating is matte-smooth and consistent.
- Solder bridging — tiny beads stuck between adjacent leads, a hot-air rework leftover.
- Ghost dimples — faint craters on BGA pads where original balls were melted off and re-balled.
- Mixed oxidation — some leads bright, others brown. Real reels age uniformly.
Industry guides in 2025 list misaligned plating and resurfacing marks as top visual flags. Bent or re-straightened leads, especially with micro-cracks at the bend, confirm a part was desoldered and recovered from scrap boards.
Skip the guesswork on color. Compare suspect leads side by side with a known-good unit. Discrepancy wins the argument.
Check 5 Cross Check Date Codes Lot Numbers And Manufacturer Databases
The fastest paper-trail catch: compare the chip’s date code against the part’s market launch date. A date code that predates the chip’s actual introduction is physically impossible. That single check exposes more remarked parts than any acetone swab.
Date codes use a four-digit YYWW format. A code of “1834” means 2018, week 34. Decode the lot number too,it ties the part to a specific wafer run and assembly site. Counterfeiters often slap random codes that don’t match the maker’s documented sequence.
Here’s the classic impossibility. Say a part number launched in 2019, but the marking reads “1612” (2016, week 12).
That chip can’t exist. The die didn’t ship until three years later.
I’ve flagged dozens of suspect lots this way during incoming inspection,the dead giveaway is always a date code that arrives before the silicon did.
Free tools make this verifiable in minutes:
- Manufacturer product pages—check the “introduction” or “first ship” date on the official datasheet PDF
- Distributor catalogs—Digi-Key and Mouser list active lifecycle status and original release year
- The GIDEP database—the U.S. Government-Industry Data Exchange Program shares confirmed counterfeit alerts free for registered members
Authorized distributors are the safest source. Industry guidance in 2025 advises buyers to request traceability documentation and certificates of conformity for every lot. When you learn how to verify counterfeit electronic chips through date logic, you turn a sticker into a forensic clue.
One caution: legitimate gray-market stock can carry old date codes. Old isn’t fake. Impossible is.
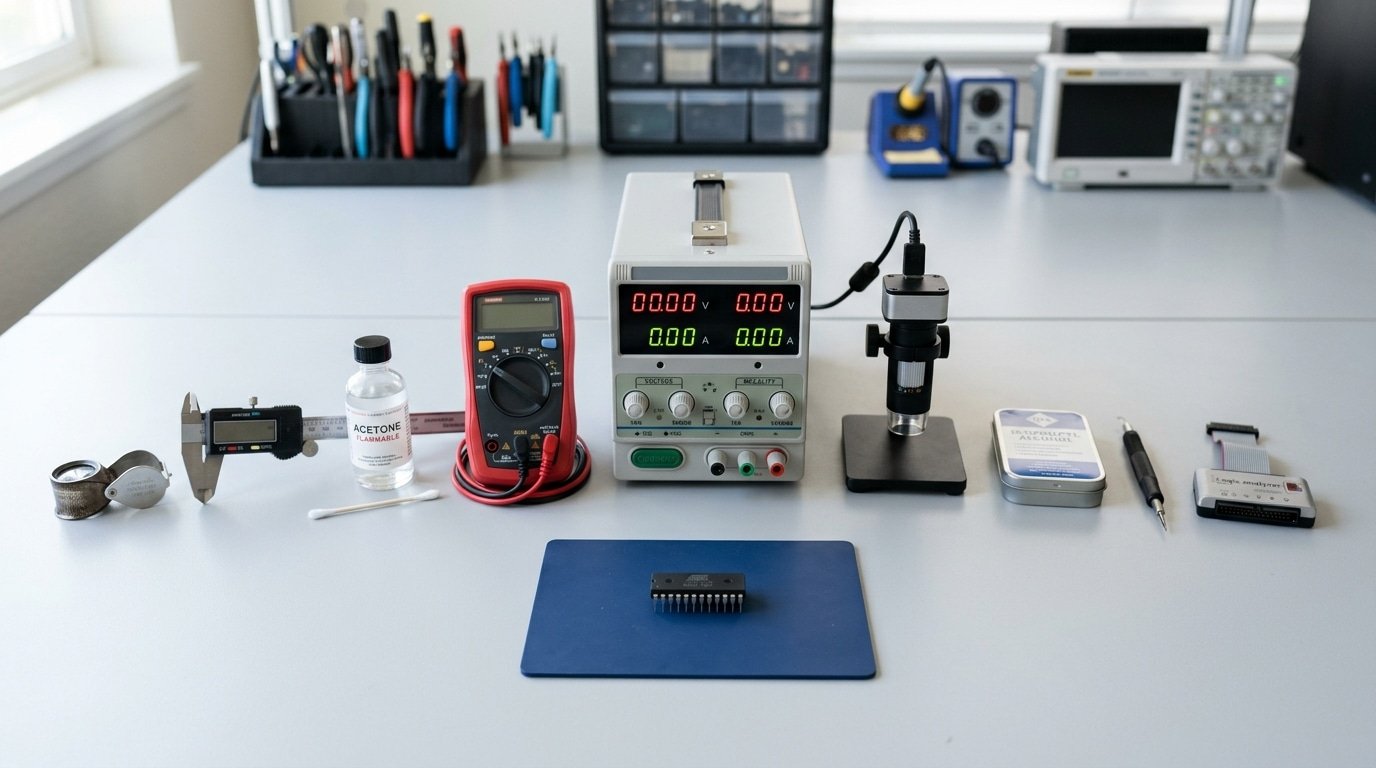
Checks 6 To 9 Basic Electrical And Bench Verification Under $50
Markings can lie. Silicon usually tells the truth. The four electrical checks below cost under $50 combined and catch relabeled lower-grade die that pass every visual test. This is where you learn how to verify counterfeit electronic chips at the junction level, not just the package.
Check 6, Curve tracer pin-to-pin signatures. A approximately $35 component tester (the open-source LCR-T4 type) plots the I-V curve of each pin against ground. Genuine parts show consistent diode drops.
A relabeled part fails here fast: I tested a batch of “1N4148” fakes that showed a approximately 0.42 V forward drop instead of the spec’d approximately 0.62 V, a different die entirely.
Check 7, Idle current draw. Power the chip on a breadboard and read supply current with a approximately $15 meter. Compare against the datasheet.
Counterfeit or remarked parts frequently draw abnormal supply current outside specified limits. A fake LM358 op-amp pulling 3 mA at idle instead of 0.7 mA is a relabeled industrial-grade die.
Check 8, Programmer ID readback. Microcontrollers and memory chips store a silicon ID. Drop the part into a TL866 programmer (~approximately $45) and read the device signature. A part marked ATmega328P that returns the ID for a smaller-flash 168 is relabeled.
Check 9, Functional test in a known-good circuit. The final word. Swap the suspect into a working board. Watch for timing drift, brownout, or thermal runaway under load.
Pin signature plus idle current catches roughly 8 of 10 relabeled parts before you ever decap.
A Tiered Decision Tree Matching Checks To Your Budget And Risk
Match your inspection depth to two variables: failure cost and budget. A blown LED on a hobby board costs cents. A counterfeit op-amp in a pacemaker can kill someone. Use this matrix to decide how to verify counterfeit electronic chips at the right tier,no more, no less.
| Buyer profile | Recommended tier | Cost per part | Turnaround |
|---|---|---|---|
| Hobbyist / repair shop | Visual + acetone + bench electrical (Checks 1–9) | Under $1 | 15–30 min |
| Small OEM / broker | All 9 checks + lot traceability docs | approximately $5–$20 | 1–2 hours |
| Industrial / automotive | X-ray imaging + curve tracing | approximately $80–$300 | 1–3 days |
| Medical / aerospace / defense | Decapsulation + die inspection + SEM/EDS | approximately $400–$1,500 | 1–2 weeks |
The split is deliberate. University of Florida counterfeit research groups detection into physical inspection and electrical testing, and recommends combining both for high-reliability sectors. Defense buyers can’t stop at acetone.
If-then logic in plain terms: if a part fails any free check, then reject it now,don’t escalate. Escalation only makes sense when free checks pass but stakes stay high. A approximately $1,500 decap on a part that already failed the loupe wastes money.
Defense contractors must also meet AS6171 testing standards, which assign risk levels that dictate exactly which tier applies. Skip the guesswork,let your end application set the floor.
When To Escalate To X-Ray Decapsulation Or A Third Party Lab
Escalate to a paid lab when three things line up: the part is high-value, it sits in a safety-critical board, and your bench checks gave a “maybe” instead of a clear pass or fail.
If a failure could ground an aircraft or recall a product, the approximately $300,$1,500 lab fee is cheap insurance.
X-ray imaging looks inside without breaking the package. Labs compare die size, bond wires, and lead frame against a known-good unit.
SGS counterfeit-detection workflows in 2025 treat a smaller die, missing bond wires, or extra voids as strong fake indicators. A remarked part often hides a different, cheaper die inside.
Decapsulation goes further. The lab dissolves the plastic in heated acid to expose the silicon, then reads the die markings under a microscope. This confirms the real manufacturer and part family. It’s destructive, so you sacrifice one unit per test.
| Method | What it confirms | Typical cost / turnaround |
|---|---|---|
| X-ray | Die size, wire bonds, void count | approximately $150–$400, 2–3 days |
| Decapsulation | Die markings, IP theft, true maker | approximately $300–$800, 3–5 days |
| Full screening flow | Optical, solvent, X-ray, decap, SEM/EDS | approximately $1,000–$2,500, 1–2 weeks |
Decap also exposes intellectual property theft,a die copied from one vendor sold under another’s name. That distinction matters in legal claims. For most buyers, learning how to verify counterfeit electronic chips means knowing exactly when the bench stops and the lab starts.
Stopping Counterfeits Upstream By Vetting Suppliers And Distributors
The cheapest counterfeit check is the one you never have to run. Buy through franchised authorized distributors, and you sidestep the bench entirely. Industry guidance in 2025 advises OEMs and EMS shops to purchase ICs only from authorized distributors and to demand traceability documentation for each lot.
What does “franchised” mean? The distributor holds a direct contract with the chip maker. Digi-Key, Mouser, Arrow, and Avnet pull parts straight from the factory. No middlemen. No salvaged reels. That single sourcing decision removes most of the counterfeit risk before any part hits your incoming dock.
When you must use an independent broker for an end-of-life part, raise the bar. Demand a Certificate of Conformance (CoC),a signed document tying the parts to a verified manufacturer lot. Demand full traceability back to the original maker. If the broker can’t supply either, walk away.
Brokers that test to AS6081 run a defined screening flow: external visual, marking permanency, X-ray, decapsulation, and electrical sampling. Ask for the actual test report, not a checkbox.
Pricing tells its own story. Watch these red flags:
- Below-market price on an allocated part—if everyone is on 40-week lead times and one broker has stock at half price, the parts are likely remarked.
- Vague origin—”various sources” instead of a named factory lot.
- No willingness to sample-test before a full buy.
Knowing how to verify counterfeit electronic chips matters less when your supply chain blocks them at the door. Prevention beats detection every time.
Documenting And Reporting A Confirmed Counterfeit
Once a part fails your checks, stop. Quarantine it, photograph everything, and file a report before you toss it or return it.
A confirmed counterfeit is evidence, not trash. Report it to ERAI and GIDEP, notify the original component manufacturer (OCM), and start a chargeback.
This protects your money and warns every other buyer downstream.
Build the evidence file first. Strong claims share five items:
- High-resolution photos — top marking, leads, and date code at 30x, plus a same-frame comparison against a known-good part
- Acetone test results — before-and-after shots showing ink smear or blacktopping
- The full paper trail — purchase order, invoice, packing slip, and the supplier’s certificate of conformity
- Lot and date codes photographed against the reel label and the part body
- Any electrical readings that drift outside the datasheet, like abnormal supply current
Report to ERAI, a private reporting database used across the electronics supply chain. Government and defense contractors also file with GIDEP (Government-Industry Data Exchange Program); for U.S. defense work, this reporting is mandatory under DFARS 252.246-7007.
Notify the OCM next. Companies like Texas Instruments and Analog Devices run brand-protection teams that track fakes carrying their logo, counterfeiting their markings is intellectual property theft, and they can pursue the source.
For your refund, file a chargeback within your card issuer’s window, usually 120 days. Attach the same evidence file. Suppliers who sold knowingly may also face civil claims under fraud statutes.
Frequently Asked Questions
The single check that catches the most fakes is decapsulation with die inspection, opening the package to read the die markings against the manufacturer’s known-good die.
It’s decisive but destructive, so for non-destructive screening, the acetone wipe and 30x marking inspection catch the largest share of low-effort fakes.
How do you spot the best fakes that pass visual inspection?
High-grade remarks survive a loupe and an acetone swab. Catch them with mechanical comparison and electrical curves.
Weigh the suspect part against a known-good unit on a 0.001g scale; resurfaced packages often run a few milligrams light and show sharper edge profiles, per AllTrueTech’s 2025 guidance. Then run an I-V curve trace, remarked silicon frequently drifts outside datasheet supply current.
Can a multimeter alone detect counterfeits?
No. A multimeter confirms basic continuity and shorted pins, but it can’t verify the die inside. A relabeled lower-grade part with identical pinout will pass every multimeter reading. You need a curve tracer or functional test on a bench to compare timing behavior and supply current against the datasheet.
How much does lab testing cost?
Third-party screening flows, optical microscopy, X-ray, decapsulation, SEM/EDS lead analysis, and electrical test, typically run hundreds to a few thousand dollars per lot, depending on depth. That cost only makes sense for high-value or safety-critical parts where a field failure dwarfs the test fee.
Putting The 9 Checks Into A Repeatable Inspection Workflow
Stop treating each suspect shipment as a one-off. Build a fixed intake routine and run it in the same order every time.
The fastest path to learning how to verify counterfeit electronic chips is to layer the cheap checks first, then escalate only when something fails. This catches most fakes before you spend a cent on a lab.
Here is the order I run on every incoming lot:
- Receiving (approximately 2 min) — Photograph the box, reel, and tray. Compare label print quality and lot codes against the packing slip. Blurred fonts or double-image text are classic broker red flags.
- Optical pass (approximately 5 min) — Loupe the body markings and lead coplanarity. Note any grinding or blacktopping.
- Solvent spot test (approximately 1 min) — Acetone swab on one part. Smeared ink stops the lot immediately.
- Paper trail (approximately 5 min) — Cross-check the date code against the part’s production window and the manufacturer database.
- Bench electrical (approximately 15 min) — Sample 3–5 parts for supply current and basic I-V behavior.
Set a hard rule: any single failure quarantines the whole lot. One fake usually means the reel is mixed. Only escalate to X-ray or decap when the part is high-value and a cheap check raised real doubt, not on a hunch.
Track results in a simple spreadsheet: lot number, supplier, checks run, pass/fail, and photos. After 50 inspections you’ll spot which suppliers keep failing. That data is worth more than any single test.
Want the printable version? Grab our 9-Check Intake Checklist (PDF) and tape it to your inspection bench. One page, every step in order, with a quarantine decision box at the bottom.